
Clearly showcasing subscription plans on your website can make a huge difference in customer decisions. It’s one of the fundamental requirements to smoothly run an online venture.
Here, the best way to do it is by adding a pricing table that allows your customers to compare plans side-by-side without further navigation. Luckily, in WordPress, it’s not difficult anymore with the Gutenberg editor and plugins.
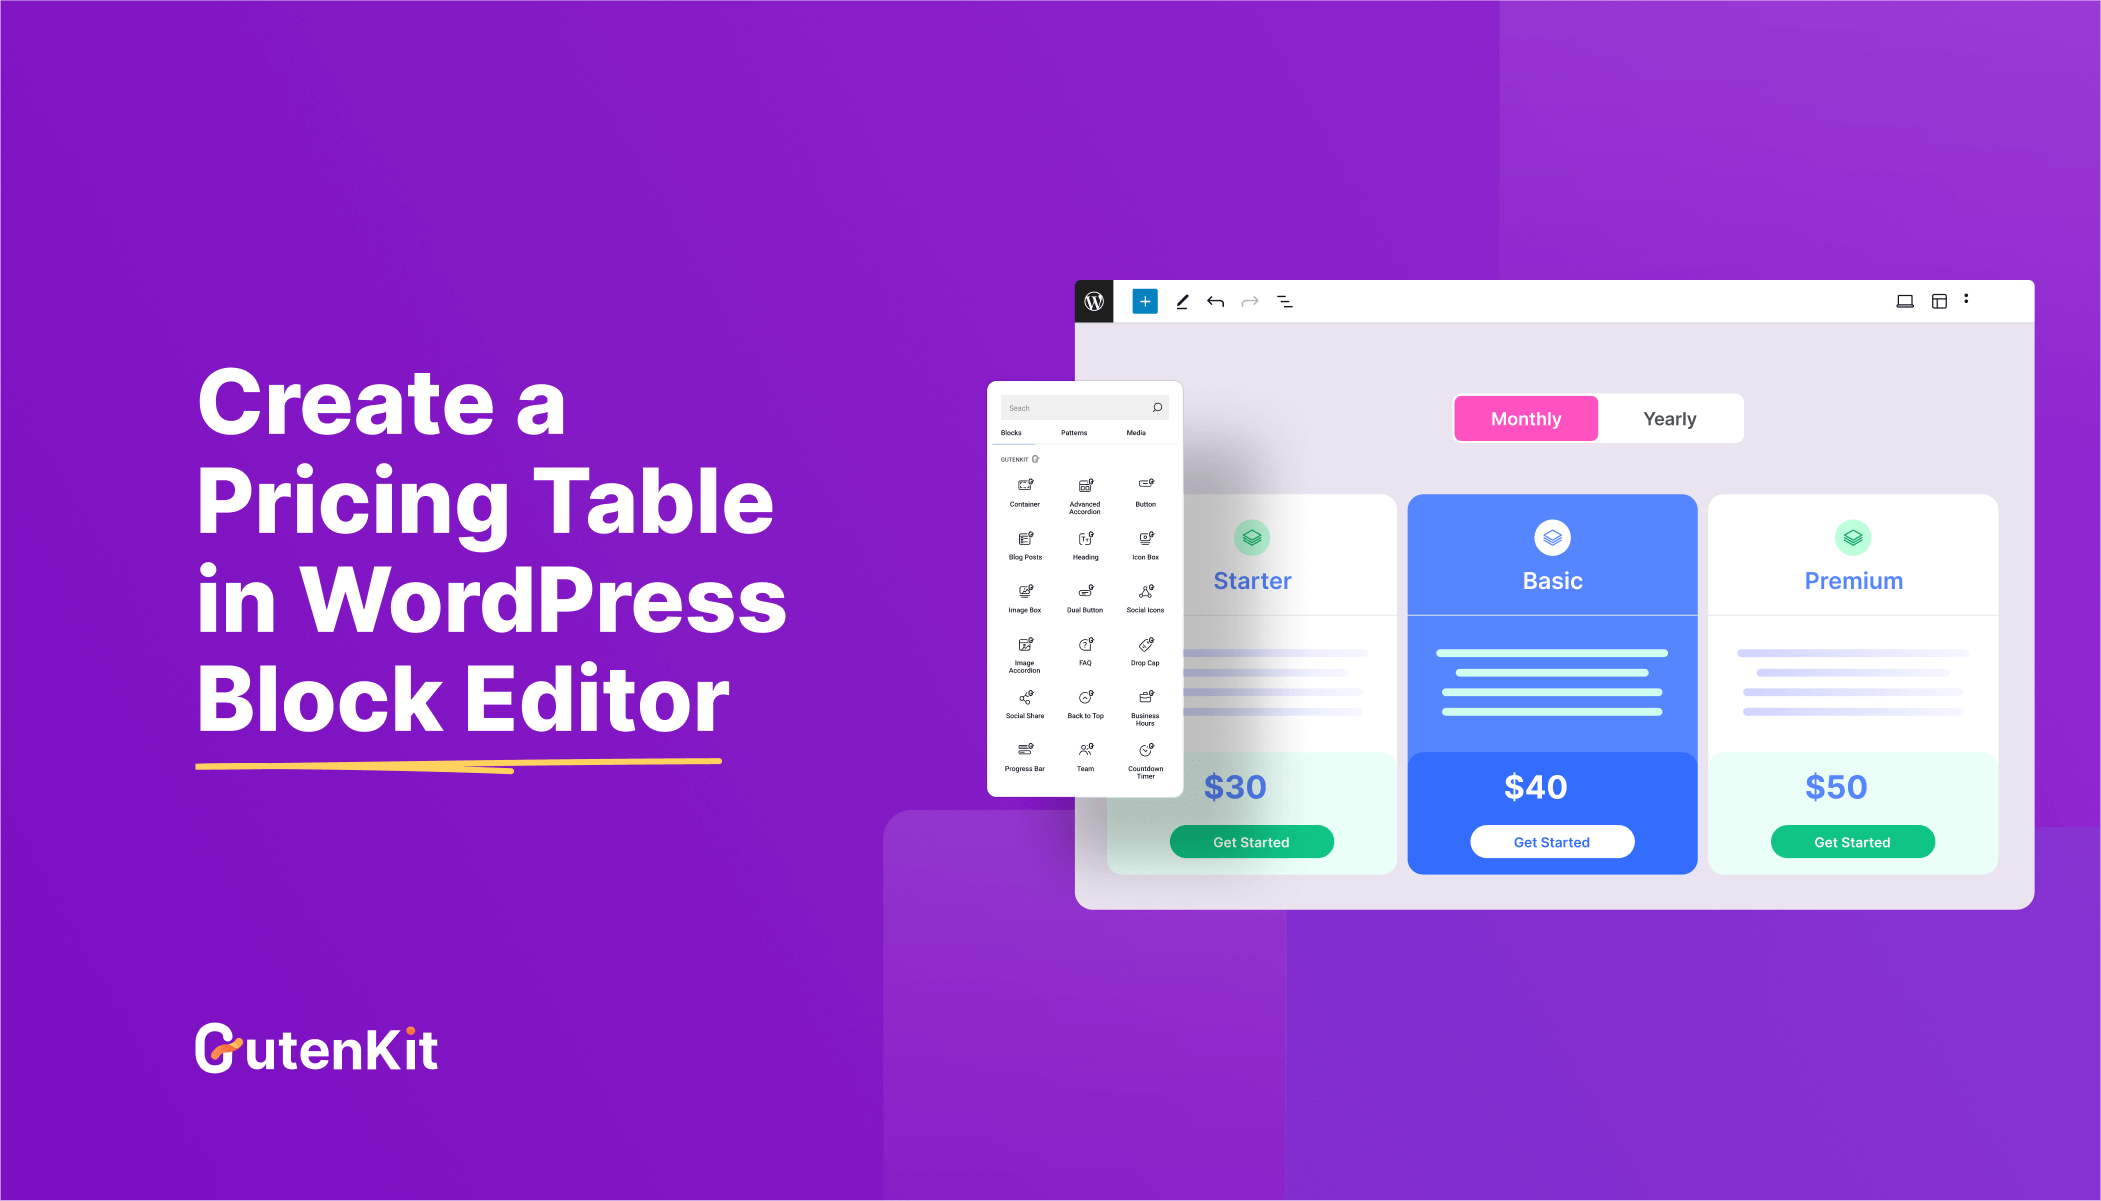
In this blog, we’ll walk you through how to create a pricing table in WordPress block editor with Gutenkit.
Table of Contents
What is a WordPress pricing table?
A pricing table refers to a visual representation where all the subscriptions of a product are displayed together, highlighting their features, pricing, benefits, and CTAs. This helps users to compare plans and pick the best subscription for their current needs.
Why use a pricing table in WordPress?
A pricing table is essential for smoothly running an online venture. It presents your product plans in the best way possible.
Here are the key advantages you will get after integrating a pricing table in WordPress:
- It helps your customers to compare plans and make an informed decision.
- Pricing table increases conversion rates as customers get a clear overview of what they will get from each plan.
- It will boost the engagement of your pricing page.
- This allows you to highlight the most popular plan and influence their buying decisions.
- You can display pricing plans professionally on your site that resemble your business or brand.
- The pricing table perfectly showcases product subscriptions with a readable feature listing.
- The visual presentation of your pricing plan will be device-responsive that helps to look good on any screen size.
- It will minimize the navigation process as customers won’t need to go back and forth for product benefits.
How to create a pricing table in WordPress
Adding a pricing table to WordPress is very simple and effortless. All you will need is a WP pricing table plugin. Here we’ll use GutenKit as it has options to create pricing tables both with blocks and patterns. Also, it is lightweight and has a minimal learning curve so that beginners or non-tech-savvy people can easily use this plugin.
So, let’s dive in to learn how to make a responsive pricing table in WordPress block editor with GutenKit:
Create a pricing table with Gutenberg patterns
If you prefer to add pricing table with a built-in pattern, then this process is for you. You just have to import a pricing table pattern and customize it according to your brand.
Let’s check more to learn in-depth:
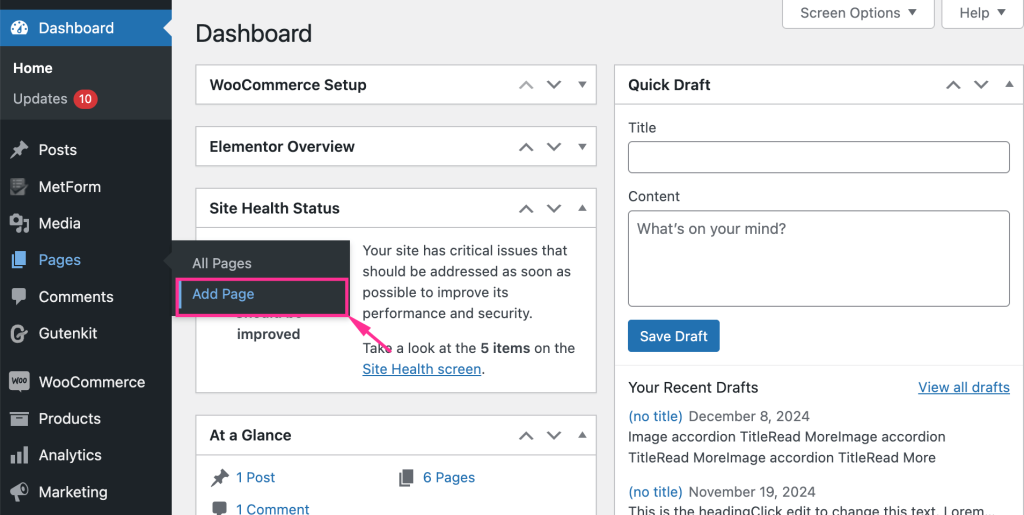
Step 1: Add a new page.
First, you need to add a page by navigating to your WordPress dashboard and visiting Pages >> Add Page. It will redirect you to a new page in Gutenberg.
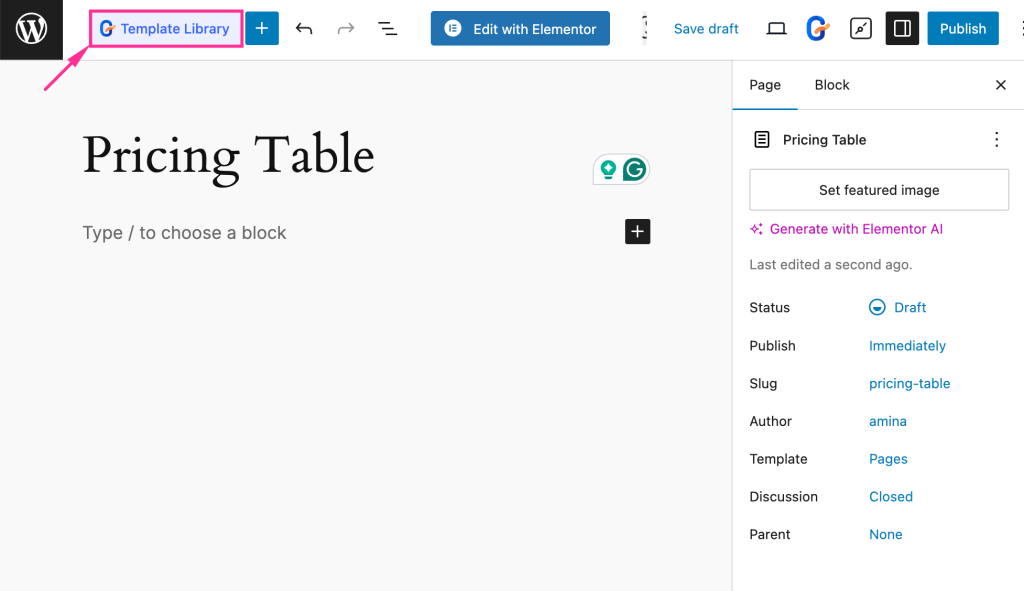
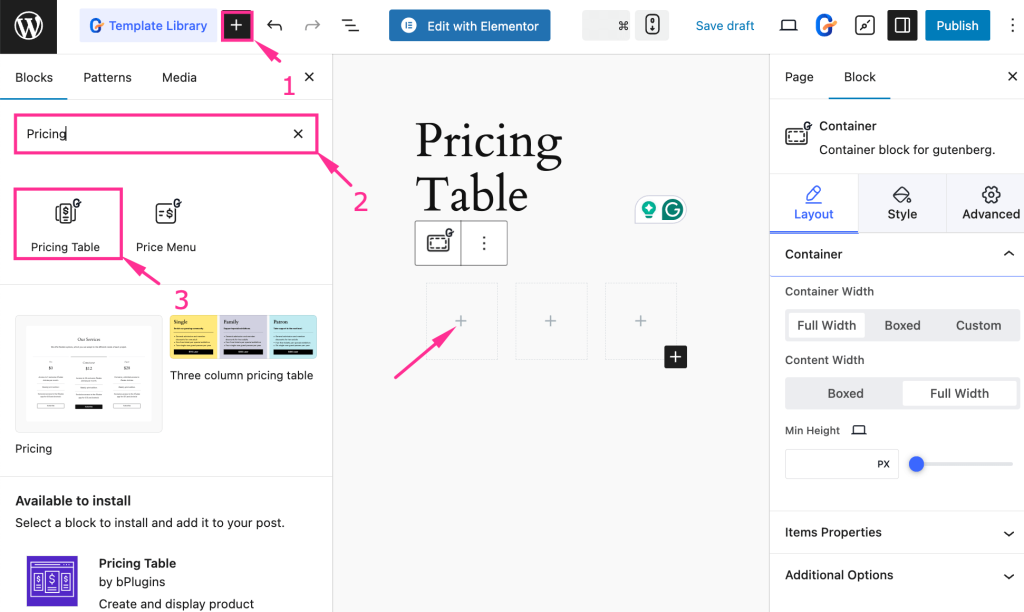
Step 2: Import pricing table pattern.
In the second step, give a title to your pricing page and import a template from the GutenKit template library. You will find the template library on the left side of your Gutenberg editor. Thus, press the “template Library”.
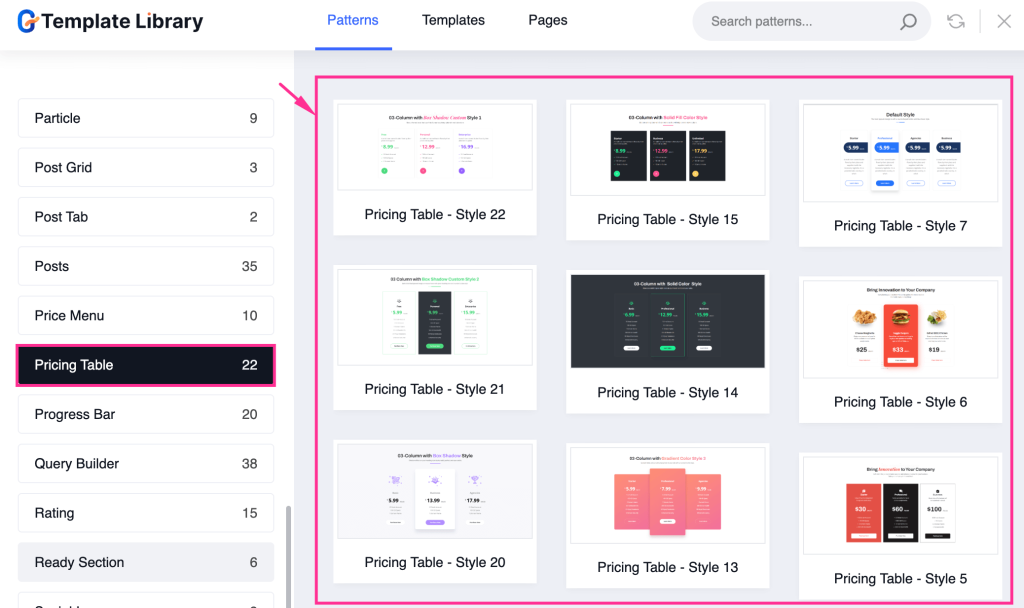
After clicking the “Template Library” button, a tab will open up with pre-built patterns, templates, and pages. Now, click “Pricing Table” in the patterns tab. There, you will get lots of prebuilt patterns for a pricing table.
From those patterns, select a suitable pattern for your pricing table and click “Import” to use that pattern. This will add your selected pattern to Gutenberg.
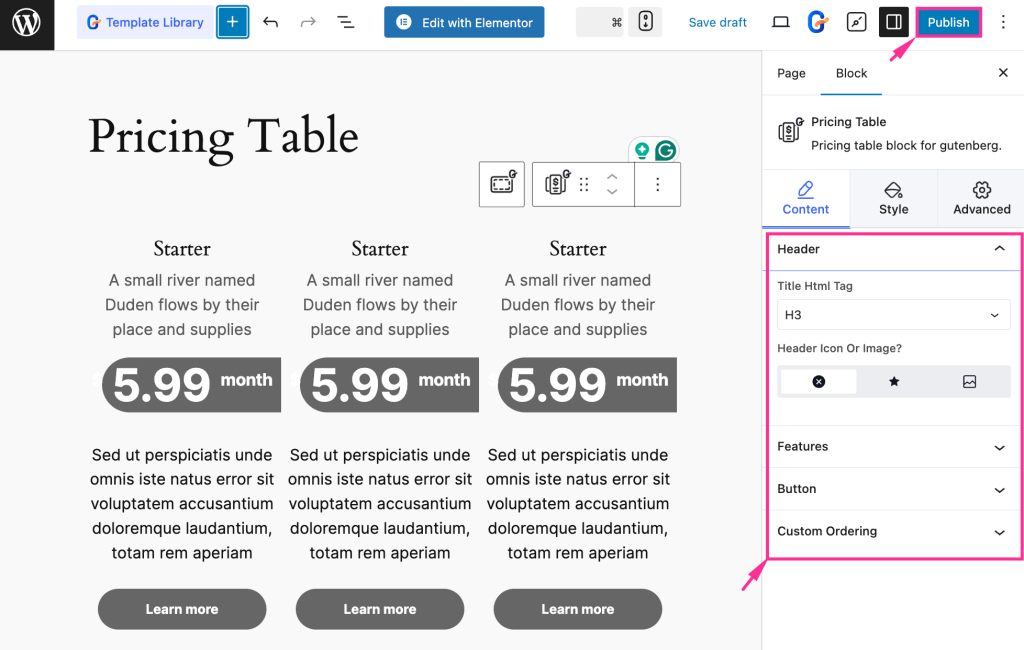
Step 3: Customize the content of the pricing table.
After importing the pattern, you can edit the content of your pricing table by directly clicking the sections.
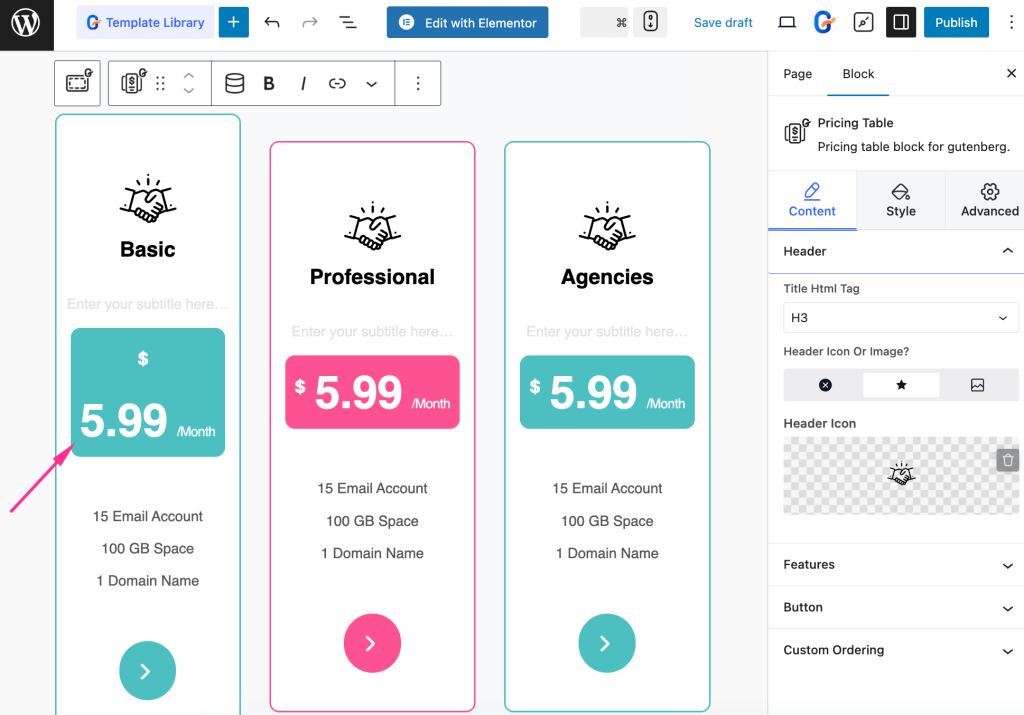
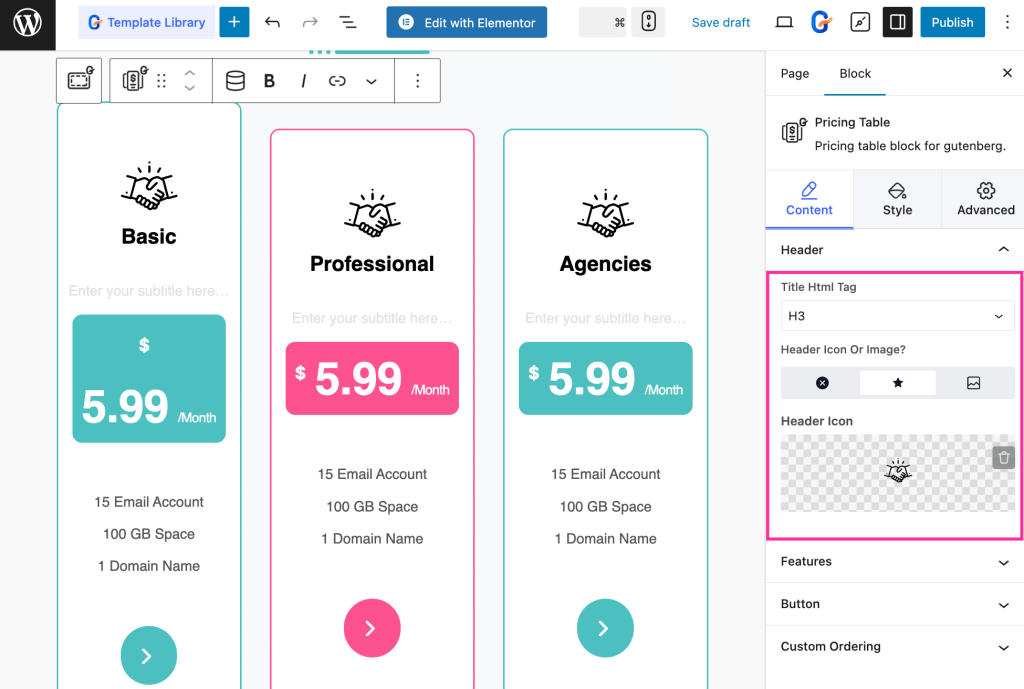
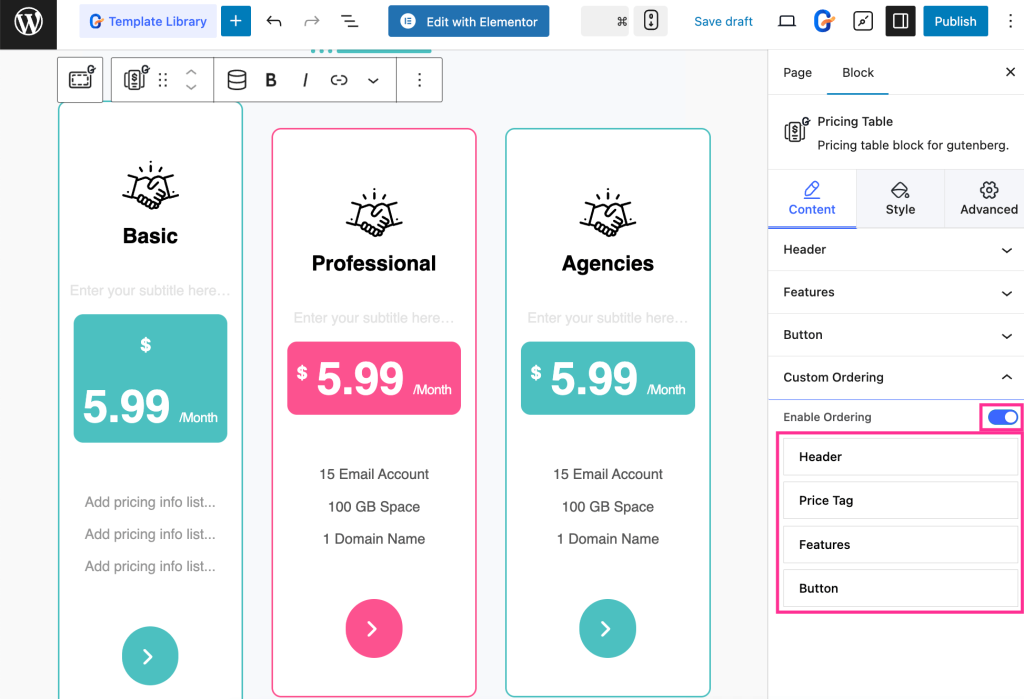
Also, you can edit the header, features, button, and custom ordering from the right side of your block editor. First, expand the Header tab and adjust the following:
- Title HTML Tag: Select HTML tag for your title.
- Header Icon or Image: Choose an icon or image that you want to show in the header. We are selecting Icon here.
- Header Icon: Add an icon for your header.
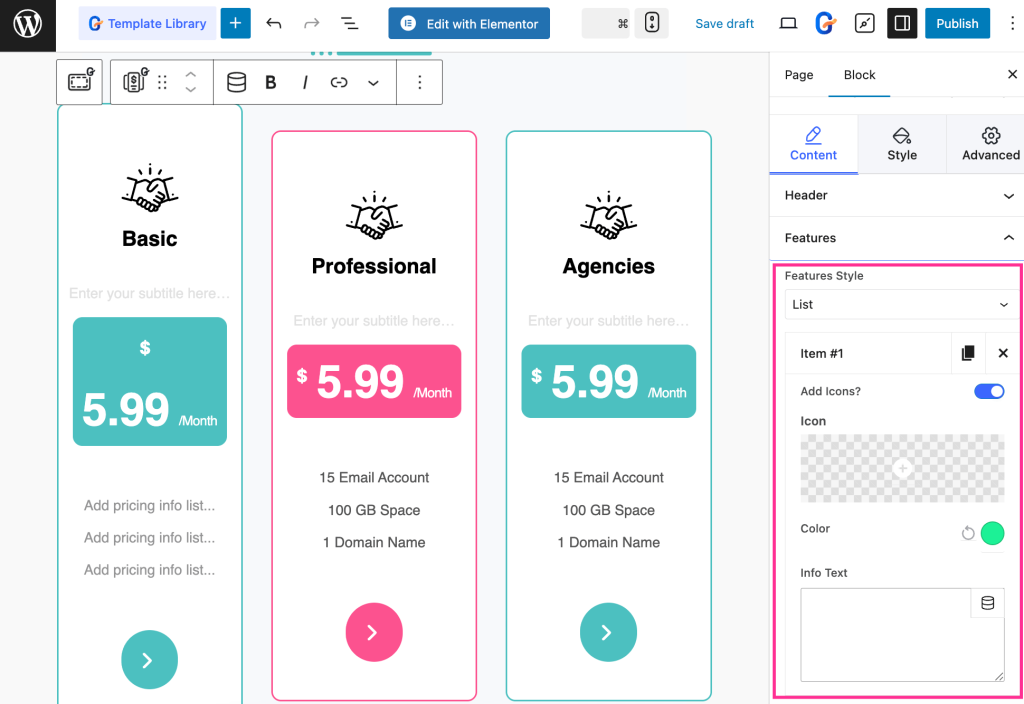
Now, expand the Features tab and choose list or paragraph from the dropdown menu. After selecting List, you can add multiple features to a list.
To add a list of features, click the “Item #1” tab and enable “Add Icons?”, import an Icon from the Icon Library, or upload SVG, select Color, and enter Info Text.
Following the same process, add multiple features by adjusting Item #2, Item #3, and so on.
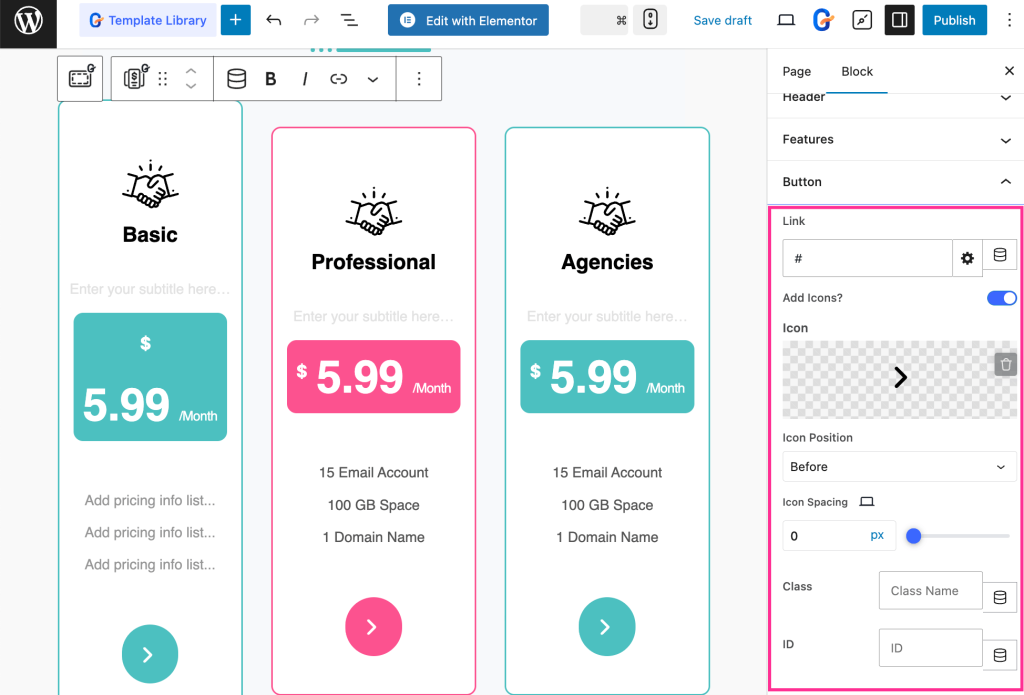
Then, expand the Button tab and customize the following areas, such as:
- Link: Insert link to your button.
- Add Icons?: Enable it for adding an icon.
- Icon: Insert an icon from the icon library.
- Icon Position: Choose a position for your icon.
- Icon Spacing: Adjust icon spacing.
- Class: Enter class name.
- ID: Give an ID.
Also, you can adjust the ordering of your pricing table header, pricing tag, features, and button by dragging and dropping.
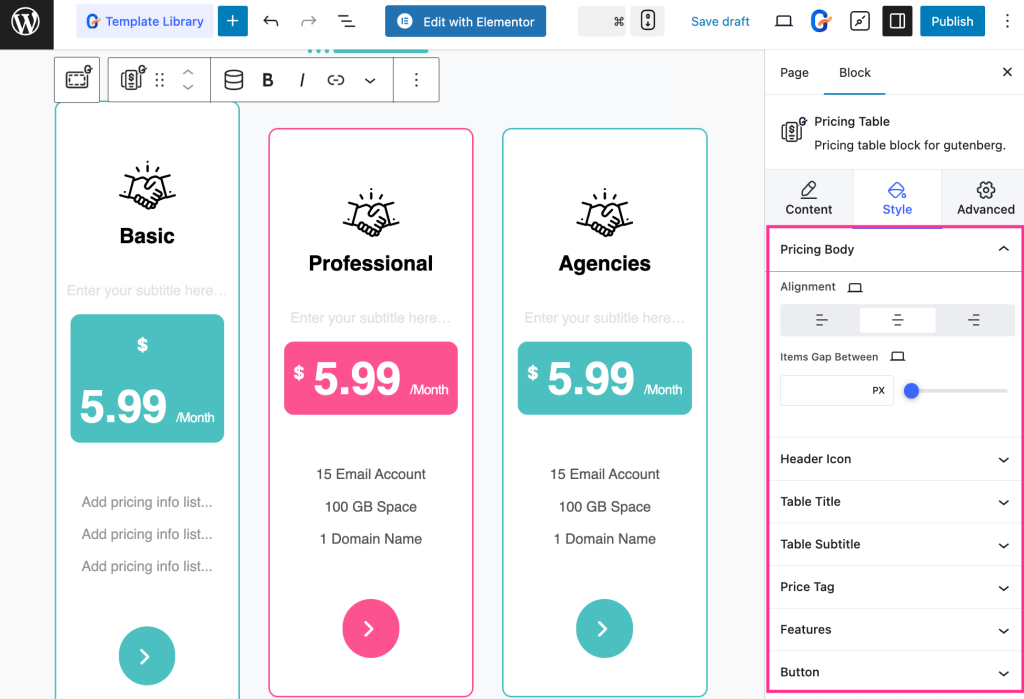
Step 4: Adjust the style of pricing table.
In the fourth step, you can customize the style of your pricing table by adjusting alignment, color, border, border radius, padding, margin, etc. of your Pricing Body, Header Icon, Table Title, Table Subtitle, Price Tag, Features, and Button.
Step 5: Live pricing table built with GutenKit.
In the final step, press the “Publish” button to live your pricing table built with GutenKit.

Create Gutenberg pricing table with blocks
Since GutenKit comes with 74+ built-in blocks, you can drag-and-drop to add pricing table in minutes. Here is how to create a pricing table in the WordPress block editor:
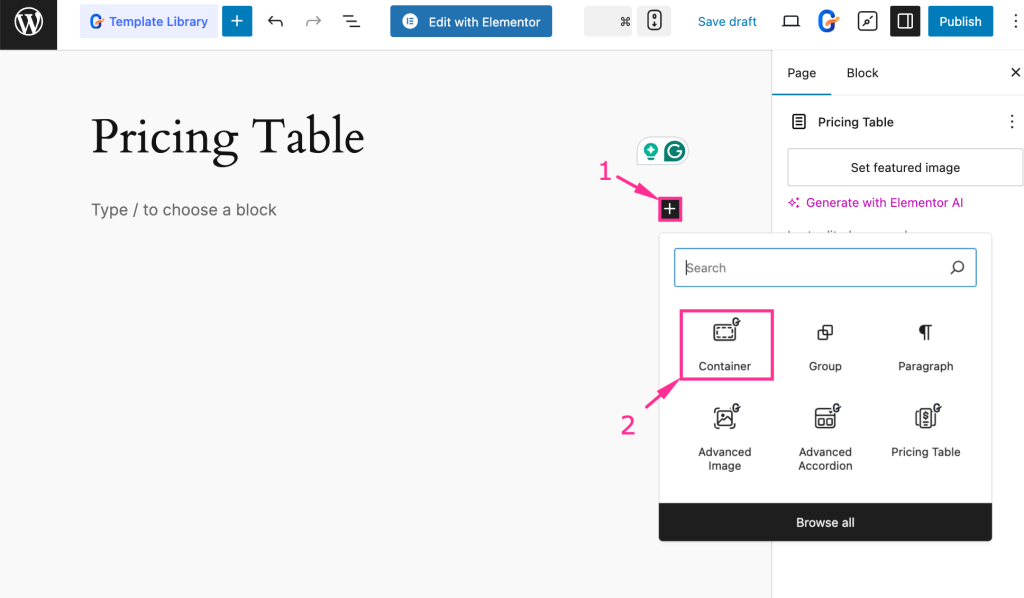
Step 1: Add a layout for the pricing table.
In the very first step, you need to select a layout for your pricing table. For that, press the “+” icon and select GutenKit’s “Container” block.
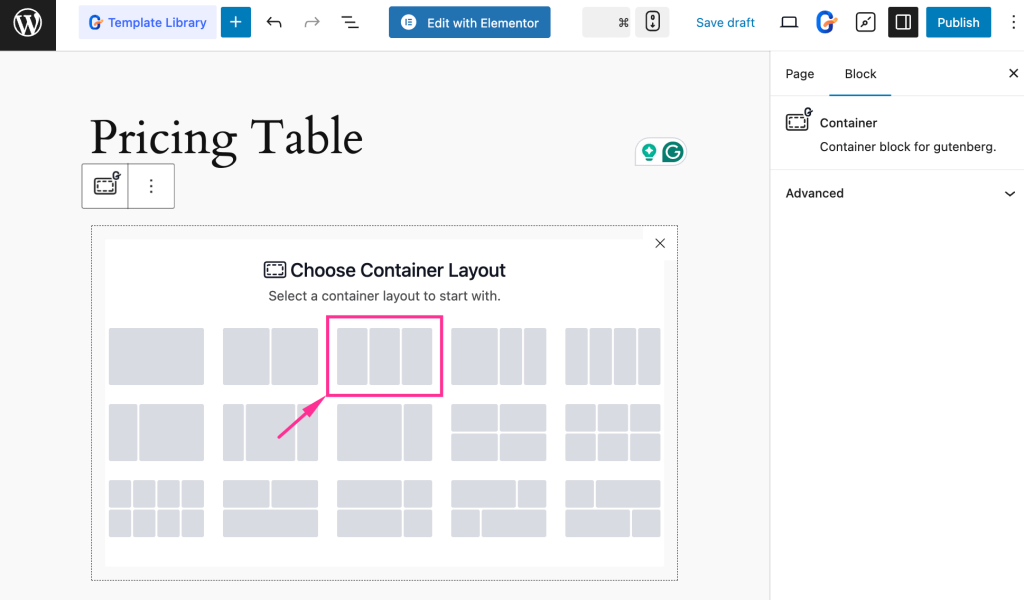
Now, choose a layout for your pricing table.
Step 2: Create a pricing table with the block.
In the second step, press the “+” icon and search for “Pricing Table” in the search bar. After finding the “Pricing Table” block, drag-and-drop it to the Editor.
Step 3: Pricing table content and style customization.
In the third step, adjust the Content and Style of your pricing table from the right side, following the previous method. Finally, after customizing all, hit the “Publish” button to make your custom WordPress pricing table live.
FAQs
Is the pricing table device responsive?
Yes, if you’re using a responsive pricing table plugin, then it will be device-responsive as well. For example, the pricing table built with GutenKit looks perfect on any screen size.
Can you add an icon or checkmark to your pricing table?
Definitely, you can add icons and checkmarks to your WP pricing table with GutenKit. You can even add icons or checkmarks to your feature list. Vast customization opportunities are open for GutenKit users.
Can you create a custom pricing table?
Yes, you can create a fully customized pricing table that resembles your brand or business. With GutenKit, you will be able to add such pricing tables with Gutenberg blocks and patterns in minutes.
Wrapping up
A well-organized pricing table is a powerful factor that guides your customers to the right plan they are looking for with minimal effort. With Gutenkit, you can easily add responsive pricing tables to your WordPress website in minutes using the Pricing Table block.
By following the steps above, you’ll be able to design pricing tables that not only look great but also improve user experience and drive more sales. Now it’s your turn to take action and present a pricing table on your pricing page that truly highlights plans and lets customers pick the most suitable subscriptions for them.
Leave a Reply